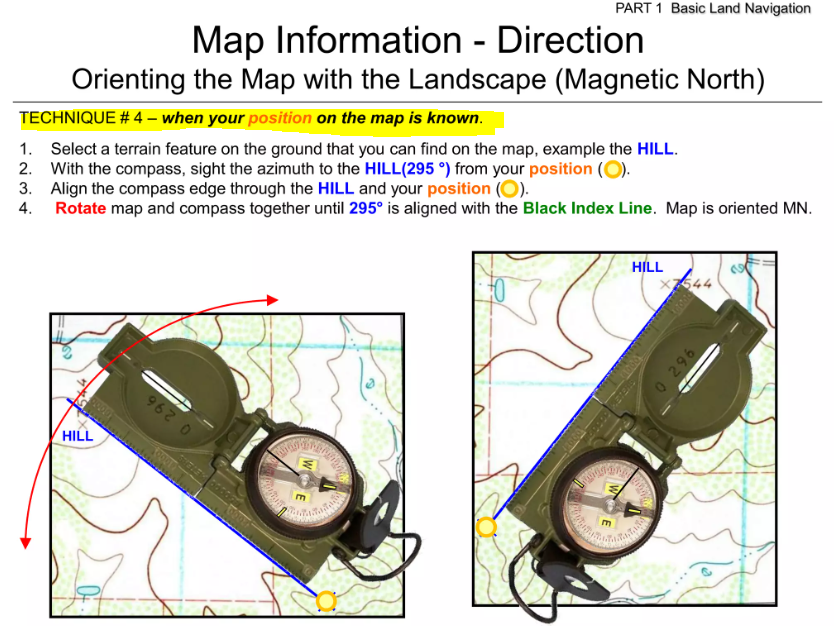
There are 4 techniques to orienting our map. Technique#2 and #1 are the most ideal ones and technique#3 is the least ideal one in my own opinion. Technique#2 is my go to.


M.S. in Computer Science and Engineering
There are 4 techniques to orienting our map. Technique#2 and #1 are the most ideal ones and technique#3 is the least ideal one in my own opinion. Technique#2 is my go to.

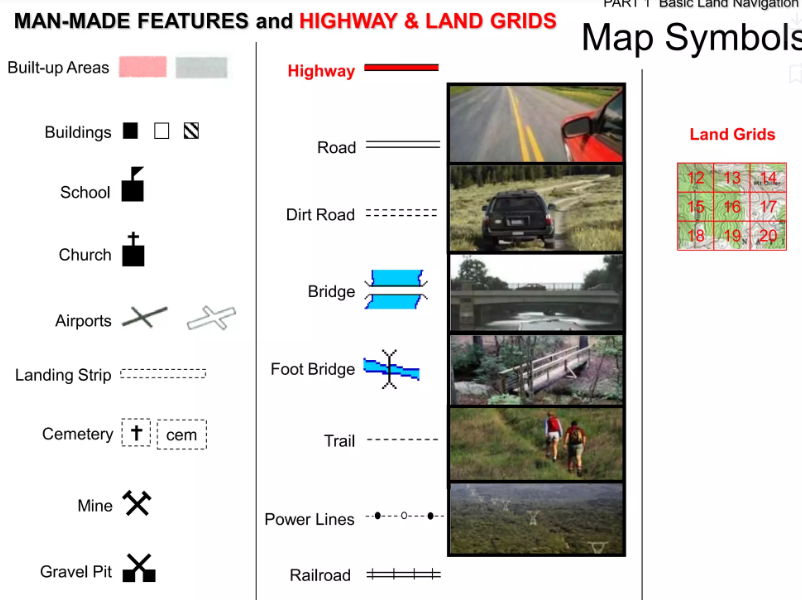
It is very important that we need to read Map instructruction here aka Margin Information where it is always at the bottom of Tropographic Map:
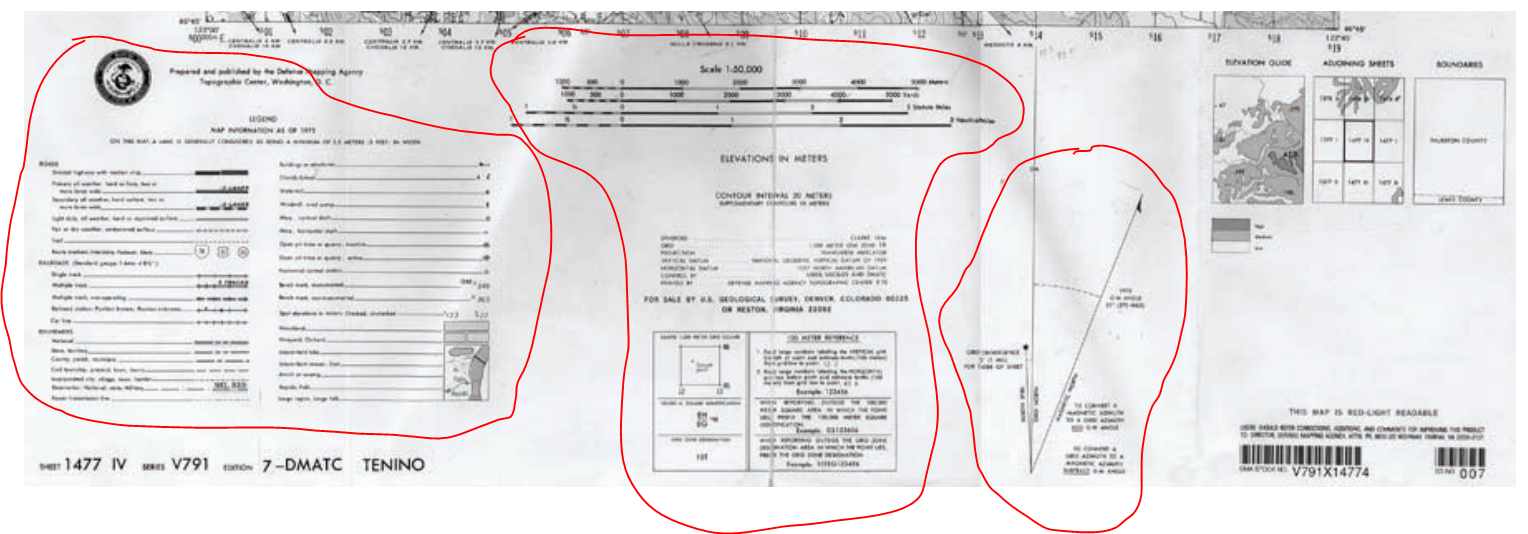
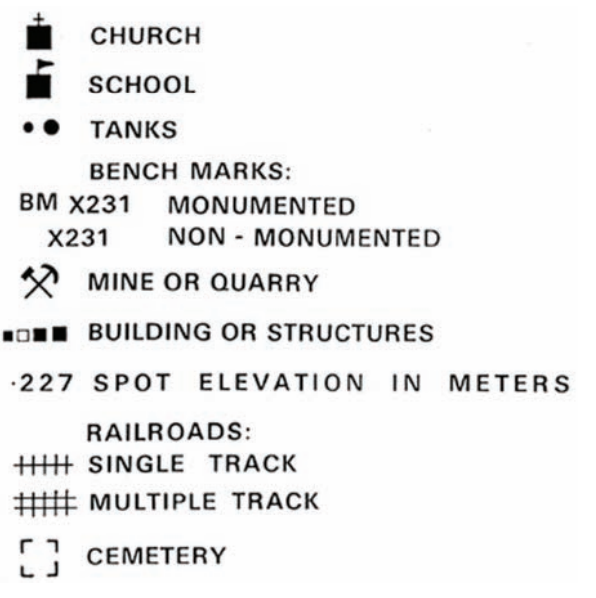
1- Map Legend: show the symbols of prominent natureal and mad-made objects on the ground.

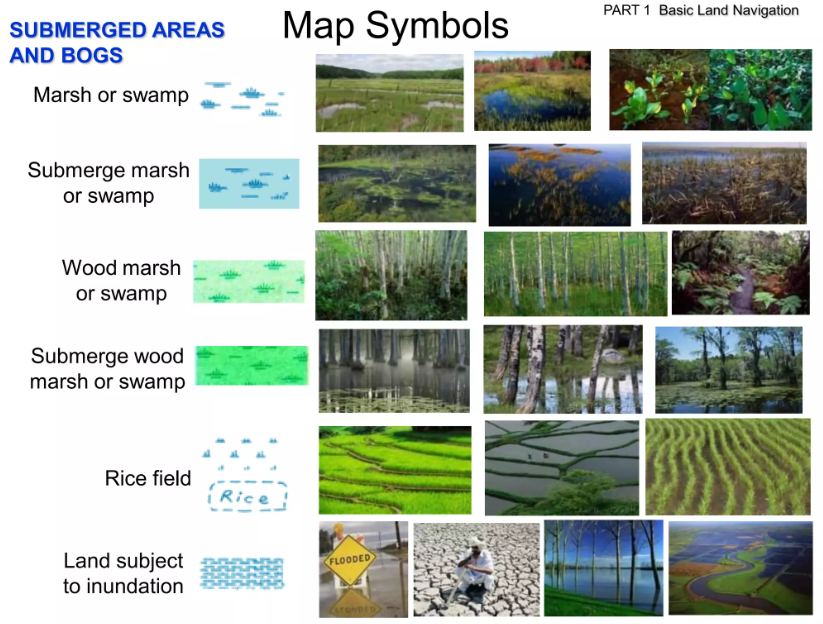
I used to walk through Marsh or swarmp once during orienteering in VA and it was not fun.
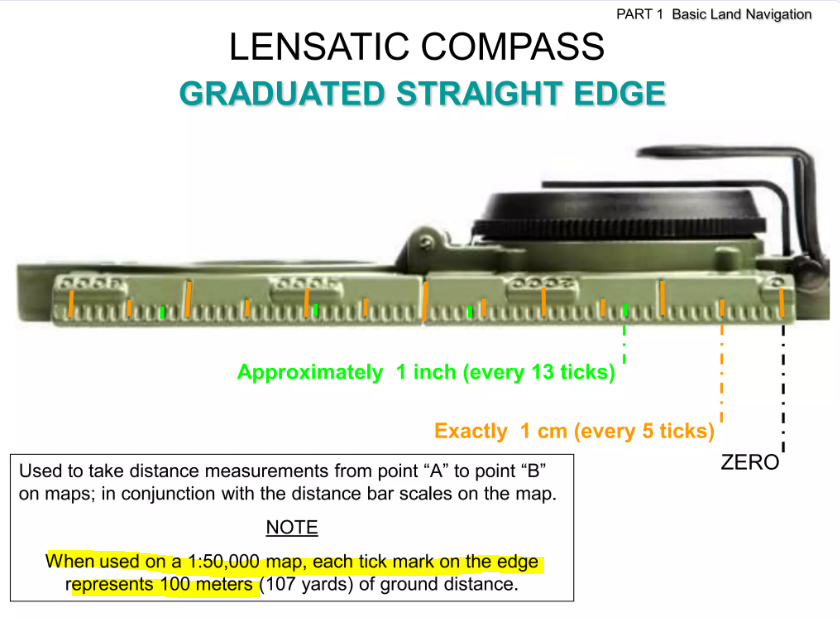
2- Map Scale: give us the ratio of the distance on the map to the distance on the actual ground.
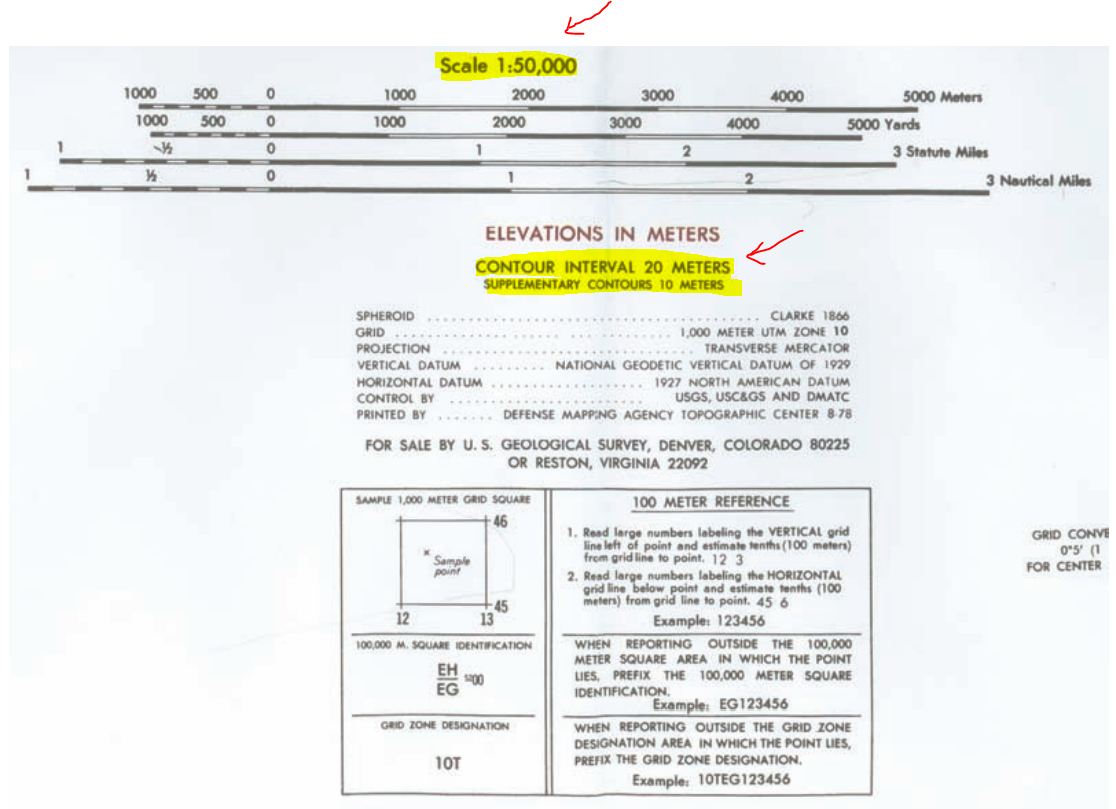
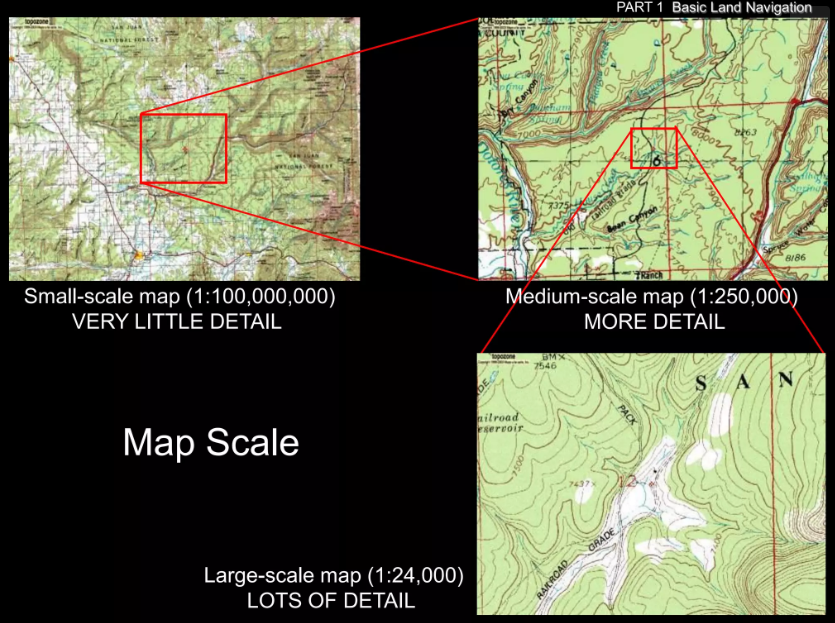
Above, Scale is shown as 1:50,000 meaning 1 inch on the map equals 50,000 inches on the actual ground. Or 1 meter on the map equals 50,000 meters on the ground. The larger the ratio, the less detail can be placed on the map. So the smaller radio means more detail on the map. E.g 1:25,000 will have more detail on it.
Military map is usually 1:50,000.
The right side tells you what unit measurement you want to use where as the left is always in meters so as seen here each alternative color dot line is 100m at the left so 5x of alternative dot line is 500m and 10x = 1000m

3- The declination diagram:
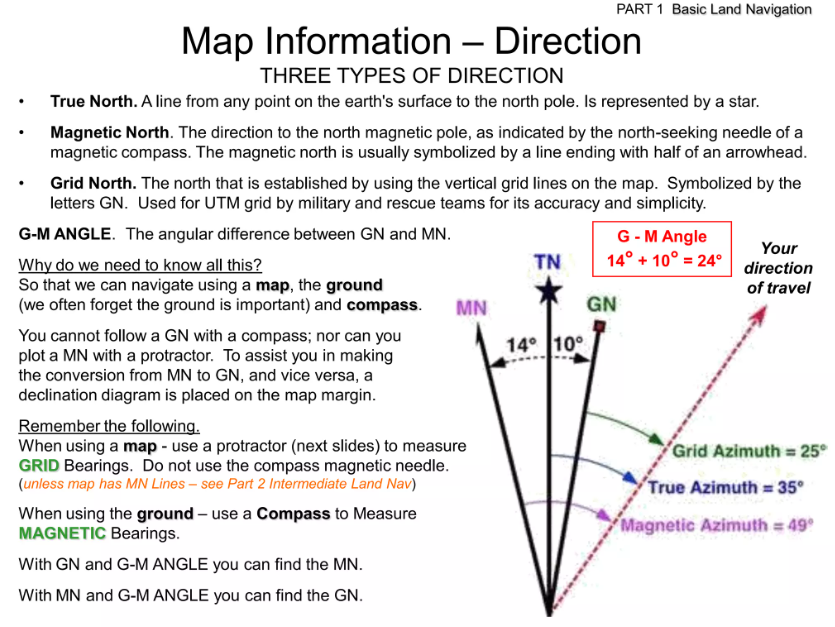
The 3 Norths
True North, Magnetic North, and Grid North
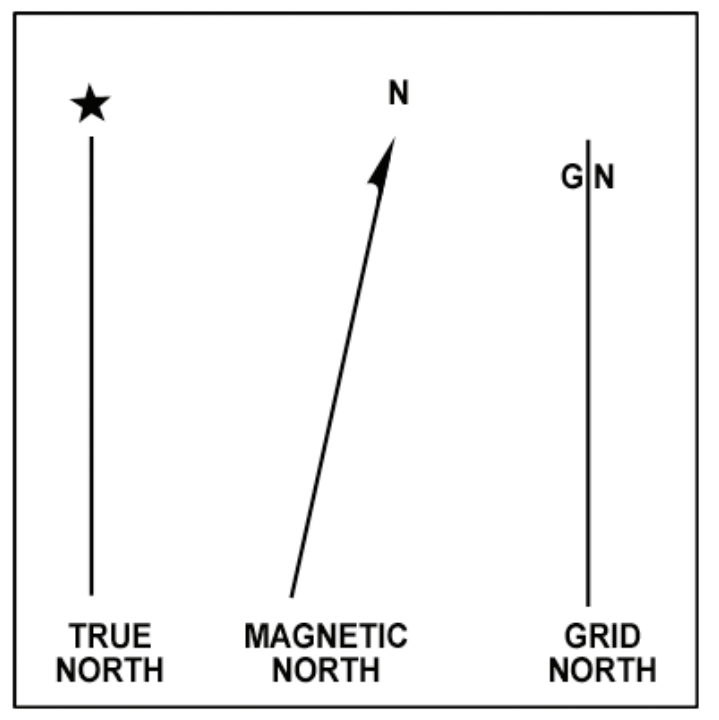
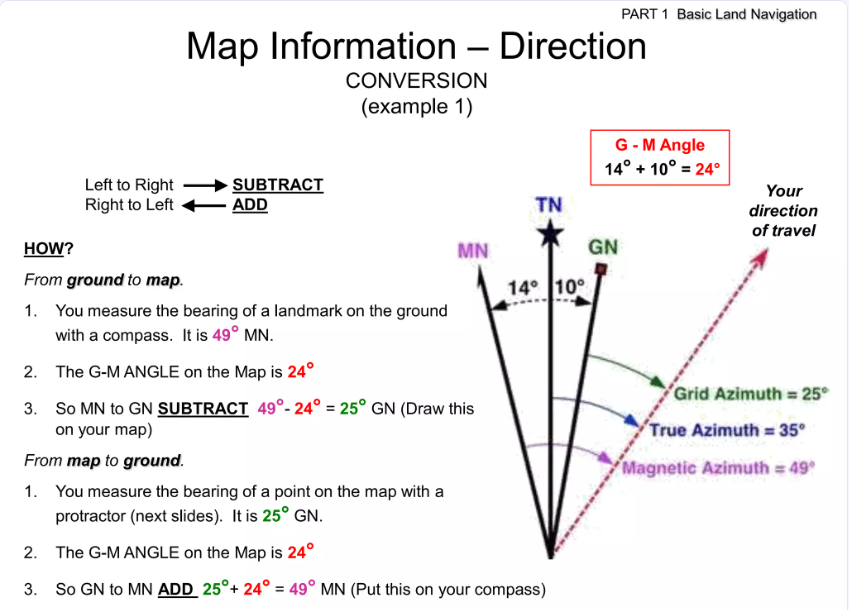
The declination diagram shows the 3 norths above on our map and it is very important to know how to convert Grid Noth Azimuth (Azimuth retreived after calculation on your map) to Magnetic North Azimuth (the Azimuth to be used on your compass) aka G-M angle.
For example below:
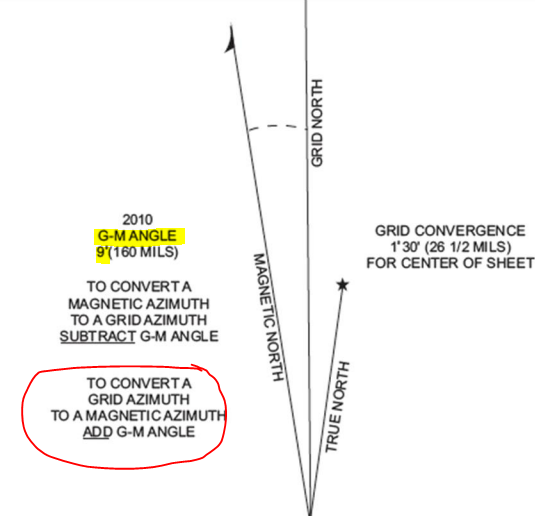
To convert from Grid Azimuth to Magetic Azimuth, you will have to ADD G-M angle which is 9 degree
E.g I found the azimuth on the map to my destination is 150 degree so to use it on my Compass, I will have to add it with 9 degree: 150 + 9 = 159 degree so I would dial my compass azimuth to 159 degree.
Note: Converting with GM angle that resulted in value greater than 360 degree or less than 0 degree.
E.g: Grid Azimuth is 357 degree + 9 degree to convert to Magnetic Azimuth = 366 degree (note that on the compass there is only 0 degree to 360 degree) so in this case we will have to substract it with 360: 366 – 360 = 6 degree magnetic so I would dial 6 degree on my compass.
E.g Grid Azimuth is 5 degree and the G-M angle on the map is -12 so converting it to Magnetic Azimuth: 5 + (-12) = -7 (note that on the compass there is only 0 degree to 360 degree) so in this case we will have to add it with 360: -7 + 360 = 353 degree magnetic so I would dial 353 degree on my compass.
Additional information:
Too detail but point to remember is right to left = ADD and left to right = substract but usually Map margin would tell you whether to ADD to substract based on the conversion you are using either G to M or M to G (G: Grid, M: Magnetic).
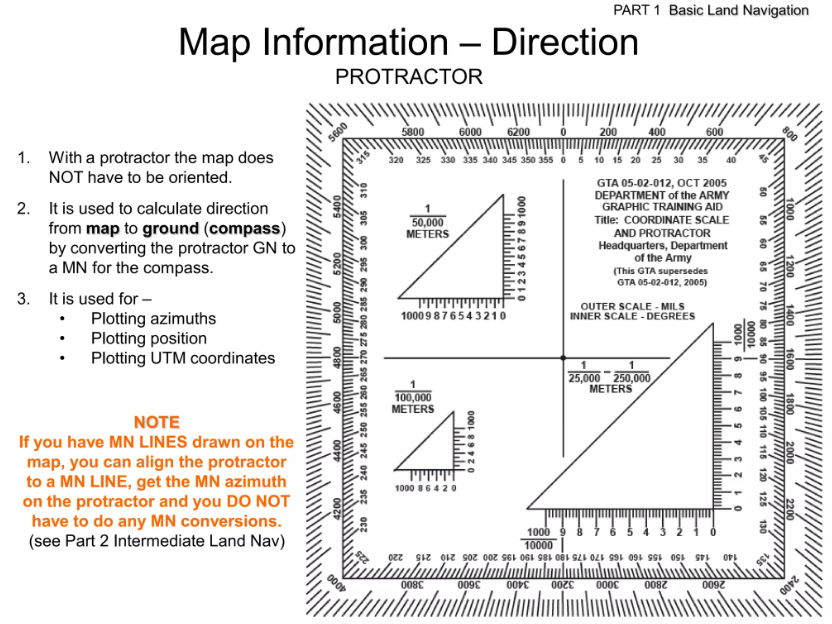
Tip: you either look at the map margin to know your map scale so you can know which Triangle in your protractor (scale) would be used to plot your point on the map or just put each triangle on the map grid and if it fits the map grid, it is to be used. Ploting point on the map is easy and if you are a soldier you would be expect to know how to do it. Rule of thumb when ploting a poing: the point is plotted from left to right and down to up direction per the grid points.
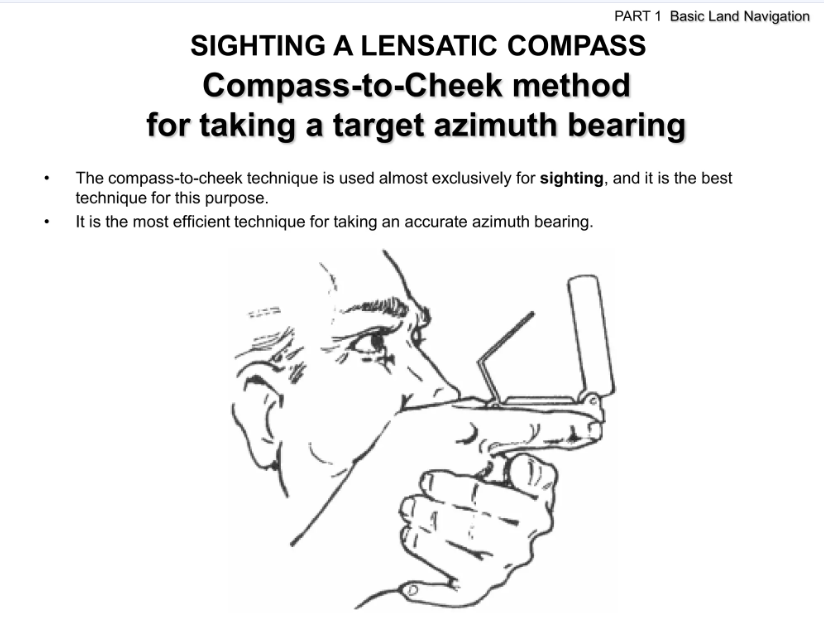
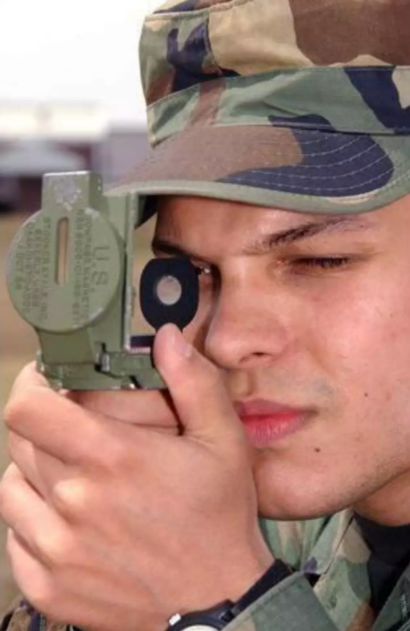
Center-Hold method
This is how to do Center-Hold method:
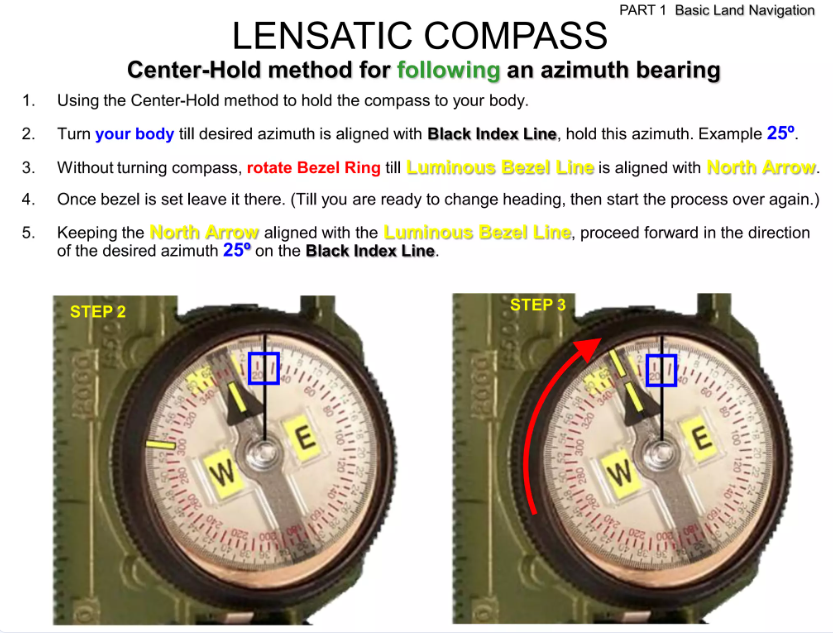
Tip: when walking at night, as long as you alighn your North Arrow with the Luminous Bezel line, your course of direction should be made automatically without having to look at the degree number on the ring itself because LandNav at night whitelight or red light is prohibited and when stop to check your map only redlight is permitted.
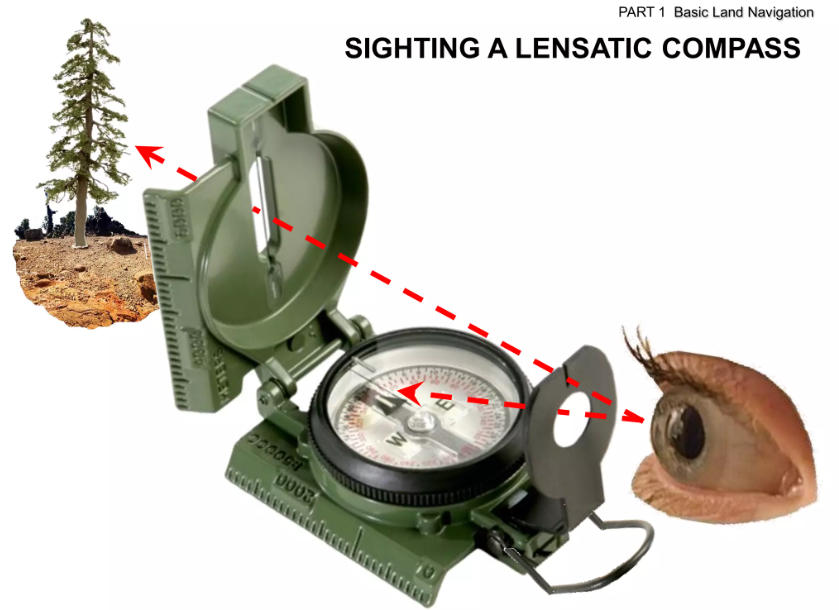
It is the most precise azimuth bearing approach, and I completely agree with it. I recently went orienteering in Virginia Parks with my local orienteering group. Normally, I stray from the planned course of my calculated azimuth quite a bit, but this time, I used the method below, which involves looking at my calculated degree course of direction and selecting a nearby tree that I simply walked to. I kept doing this again and over again. Every time I got to the tree I was walking to, I shot my azimuth to another tree nearby, and to my amazement, I went directly to my destination. It was incredible, I thought. Thus, it does require practice.
During this year's unit school tryout, I also scored four out of four points properly. However, because the map is so small, I mainly depended on the stream (the map is colorful, and the stream is blue). By chance, two of my points were close to the stream.
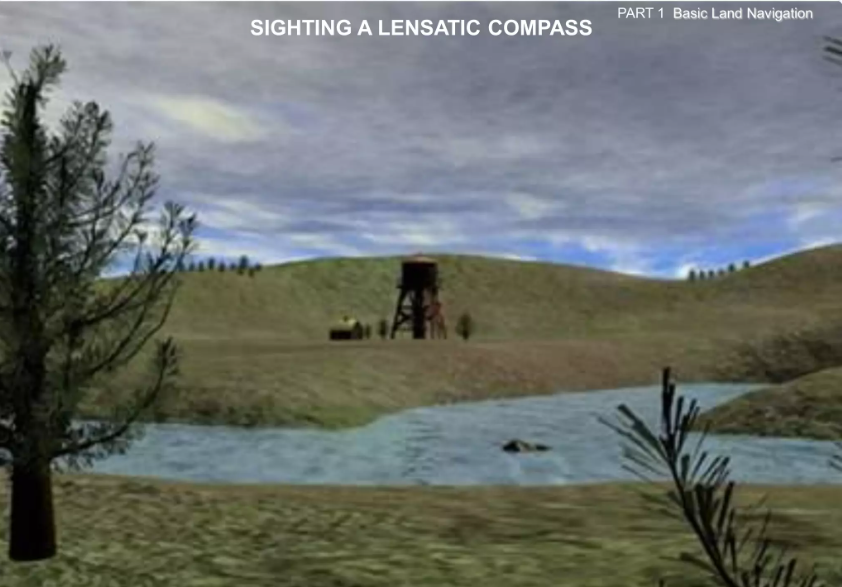
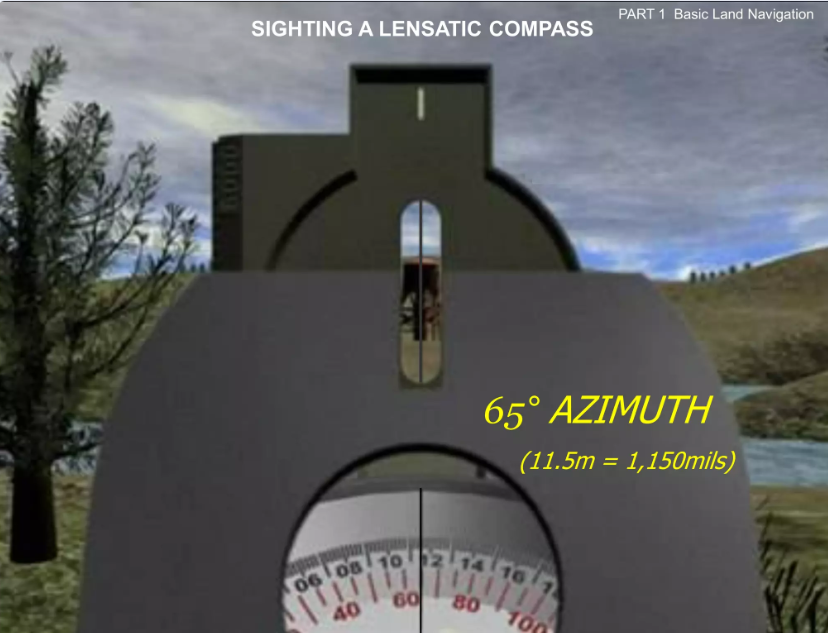
Plotting the point on the map is easy but walking to it in the wood requires practice.


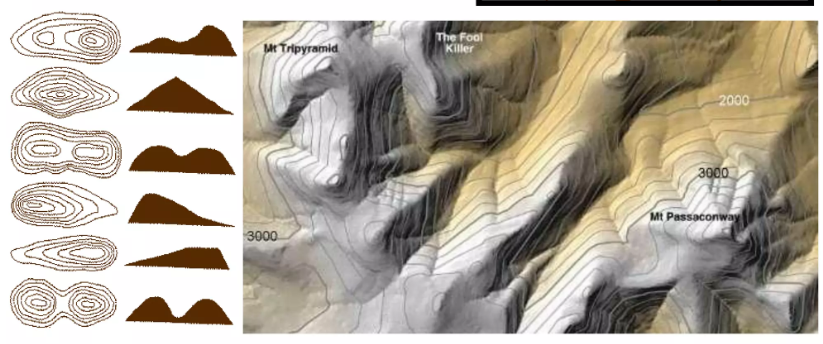
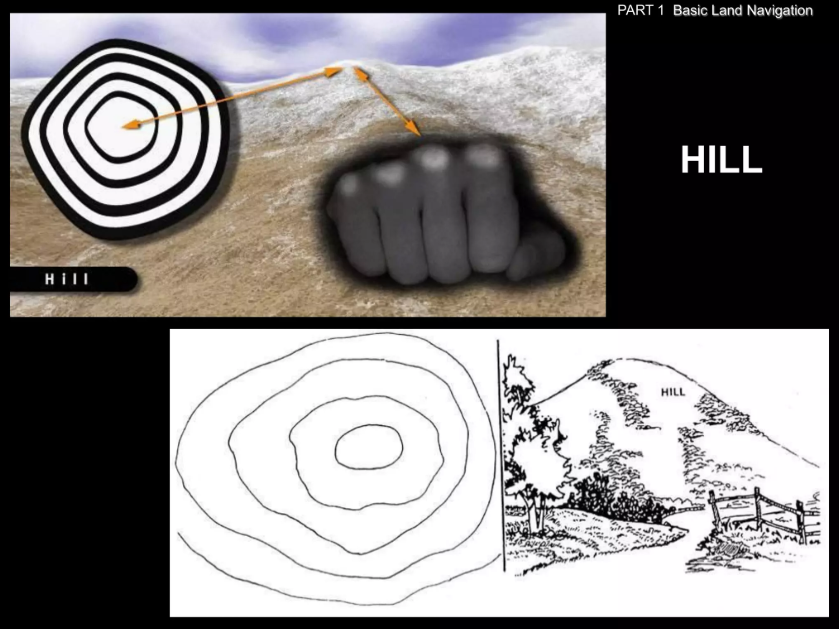
They are Hill, Valley, Ridge, Saddle, and Depression.
The acronym for the five major terrain features is often remembered as
Hidden Valley Ranch Salad Dressing
Where Hidden refers to Hill, Valley is Valley, Ranch refers to Ridge, Salad refers to Saddle, and Dressing refers to Depression.
Very important to know:
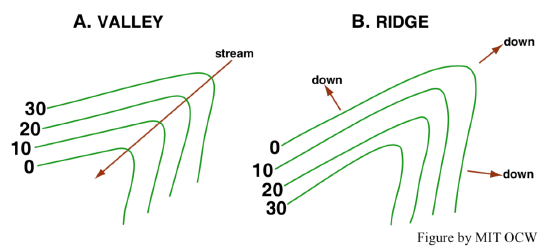
On topographic maps, you can identify ridges and valleys by looking for the “V”s: the pointy end of the “V” points uphill for valleys and downhill for ridges.
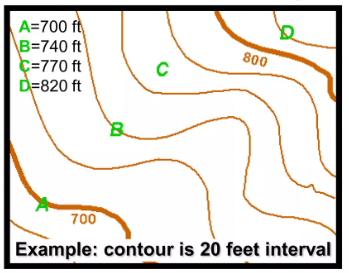
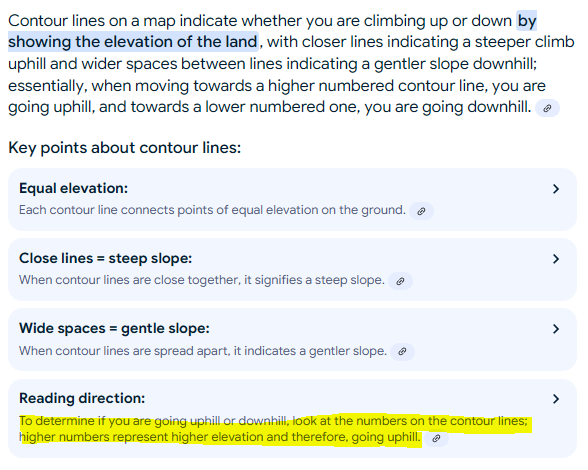
— With Contour line, it helps to know wheher you will be walking up or down so helpful when route planning because if you have to walk so much up hill then maybe walk around it would be better.

A hill:
is a high area of land where the ground slopes down in all directions from the hilltop
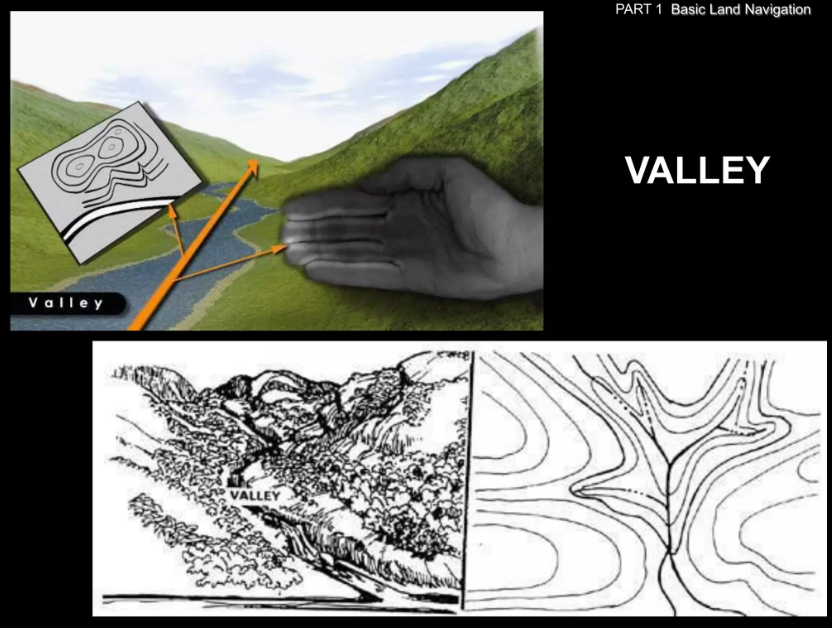
A valley:
is a low area of land between hills or mountains, typically with a river or stream running through it.
A ridge:
refers to a line of elevated terrain, essentially a long, continuous high point with sloping sides on either side, meaning you would have lower ground in most directions when standing on the crest of a ridge; it’s typically depicted on a map by “V” or “U” shaped contour lines pointing downhill. The opposit of a ridge is Valley.

A saddle:
is a low, curved area of land between two higher points, typically forming a dip or depression along a ridge or mountain range.

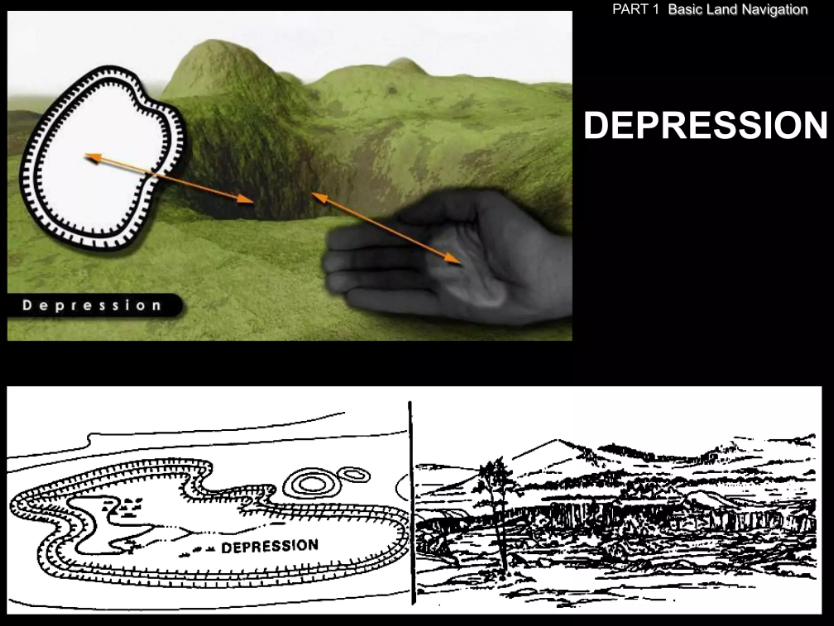
A depression:
A depression is a low point in the ground or a sinkhole. It could be described as an area of low ground surrounded by higher ground in all directions, or simply a hole in the ground. Usually only depressions that are equal to or greater than the contour interval will be shown.
There is a nasty version of the acronym though not shown here:
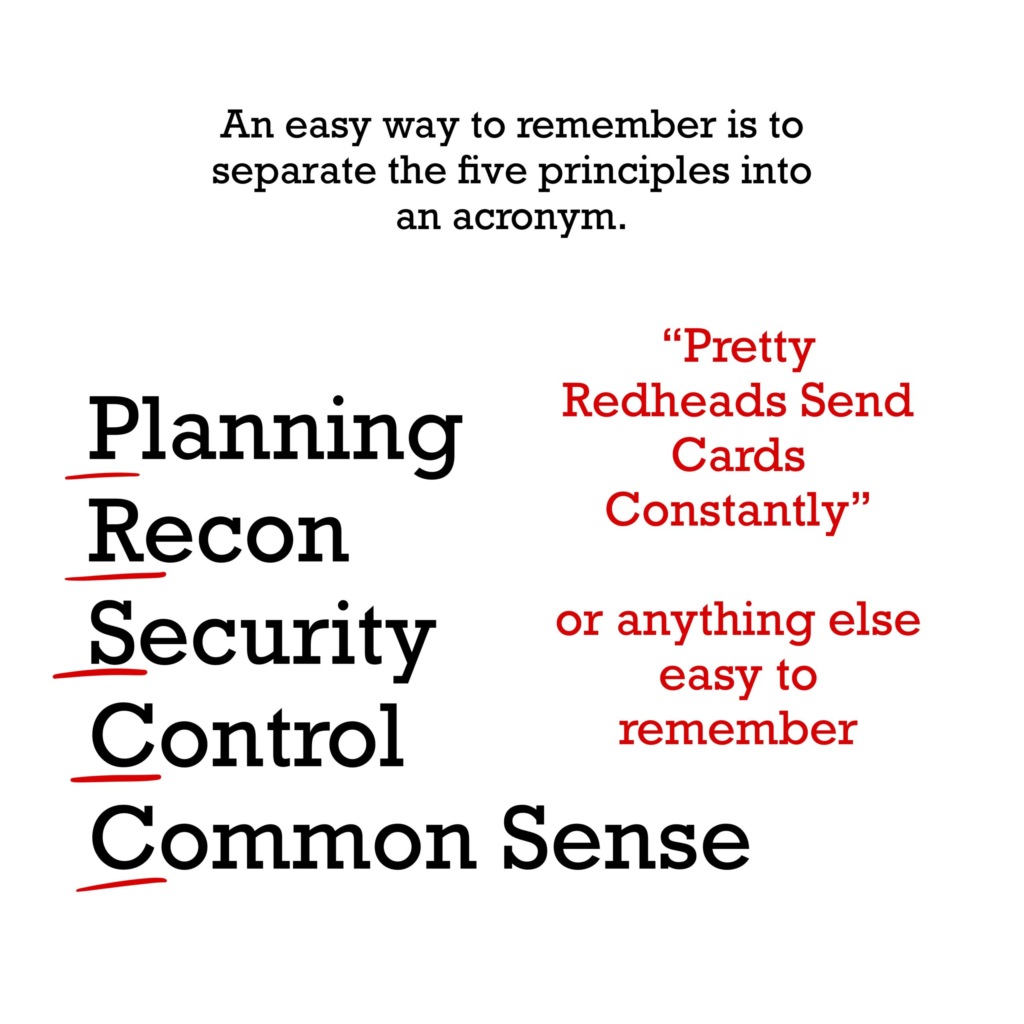
The five principles of patrolling are: planning, reconnaissance, security, control, and common sense
planning:
route planning, objective planning, and contigencies planning.
reconnaissance:
gather info about the area of operation through observation and exploration
security:
maintain awareness of potential threats and taking necessary precaution to protect the patrol from enermy.
control:
Maintaining order and discipline within the patrol, making sure all memebers know their roles and responsibilities
common sense:
Applying sound judgement and adapting tactics based on the situation on the ground, being flexible in tactics
The last three principles are especially important during the patrol itself . Security means that every direction of enemy approach is guarded at all times , so the patrol is not caught off guard . Control means that there is clear communication and execution on information between every Soldier in the patrol . Common Sense is can mean anything from the KISS principle ( “ Keep it simple stupid . ” ) , to , “ Don ’ t follow a plan if it ’ s a bad plan . ”
Chain of Command – The first six in the chain of command for a platoon are Platoon Leader , Platoon Sergeant , Weapons Squad Leader , 1st Squad Leader , 2nd Squad Leader , and 3rd Squad Leader .
(And yes usually within a platoon there are about 3 squads and within each squad there are usually A & B team with a squad leader)
Within a Team of a squad, these soliders are usually made up within a team of a squad:

Rifleman – A Soldier who carries a rifle . He has no subordinates , though the battlefield can change that . Throughout the patrol , he may be given simple standing responsibilities , such as delivering accurate rifle fire on the enemy in accordance with their leader ’ s scheme of maneuver and target precedence . Additional responsibilities may include compass checking , pace counting , and pack mule.
Squad Automatic Weapon ( SAW ) gunner – M249 is A light ( 17 lb . ) machine gun . Like an M4 rifle , it is designed to be fired from standing , kneeling and prone . However , unlike the M4 , the SAW Gunner cannot be accurate while kneeling or standing , and so he should be prone whenever the situation allows .
When I joined my company, I immediate was in placed as SAW gunner and never has been a rifleman. Being a SAW gunner is challenging, you need to be fit since you would wear full kit (body armor and helmet) plus carrring usually two SAW drums (200 rounds of 556 per drum) and one drum loaded. And you are required to run with these to your nearby cover and concealment when reacting to ememy contact (Battle Drill 1A) and if you are the B team (the rear team), usually your team would flank left or right to fire on the enemy from the side (or rear) while A team returned fire/suppress fire on the enemy so you would have to run as time is precious in battle so physical fitness is paramount.
Real story: During this year annual training oversea, due to a couple soldiers in gun team got sick so saw gunners were used as support by fire instead of gun team (usually gun team would be providing our support by fire) and we also were short of saw gunners so I volunteered to be saw gunner not just my squad but for other squad as well and if I recalled correctly we have to run about 300+ meters to our objective per iteration evolution ranged from dry, blank, and live so w/o working on my PT, I would not have been able to do it esp under extreme heat of our partnered country so yes PT is important.
(Within a squad, there are usually two teams: A team and B team and the squad leader)